A roof vent that stops moving air does not automatically need a new motor. The fault could be in its supply, controls, lid mechanism, blade or motor, and the right test depends on the exact vent model. Before ordering a replacement, identify the unit and decide which part of that chain has actually failed.
This guide is for owners and equipment buyers comparing the evidence needed for a repair. It does not specify a universal wiring procedure or a drop-in LONGWELL motor. Use the installed fan’s current manual and a qualified technician for electrical or roof work.
Identify the vent before you test or order
Record the complete vent brand, model, revision and any motor label. Photograph the controller, plug, blade hub and mounting points while they are still assembled. A vehicle model or a motor’s nominal voltage alone cannot identify the replacement. Different versions of one vent family can use different switches, rain sensing, speed controls and lid mechanisms.
For example, Dometic’s FanTastic Vent documentation distinguishes model-specific speed, reverse and rain-sensor controls. Those details do not describe every RV roof vent or any LONGWELL replacement part. Obtain the current documentation for the unit actually fitted to the vehicle.
Separate the symptom from the failed component
First note what the fan does when commanded on: no response, a hum without rotation, intermittent operation, blade rubbing, or normal rotation with weak ventilation. Also note whether the lid is open and whether any rain, thermostat or automatic control is active. These are observations, not diagnoses. A stopped fan can reflect a power or interlock issue; a humming assembly can involve mechanical drag, a control fault or the motor. Avoid assigning a probability or naming the motor from sound alone.
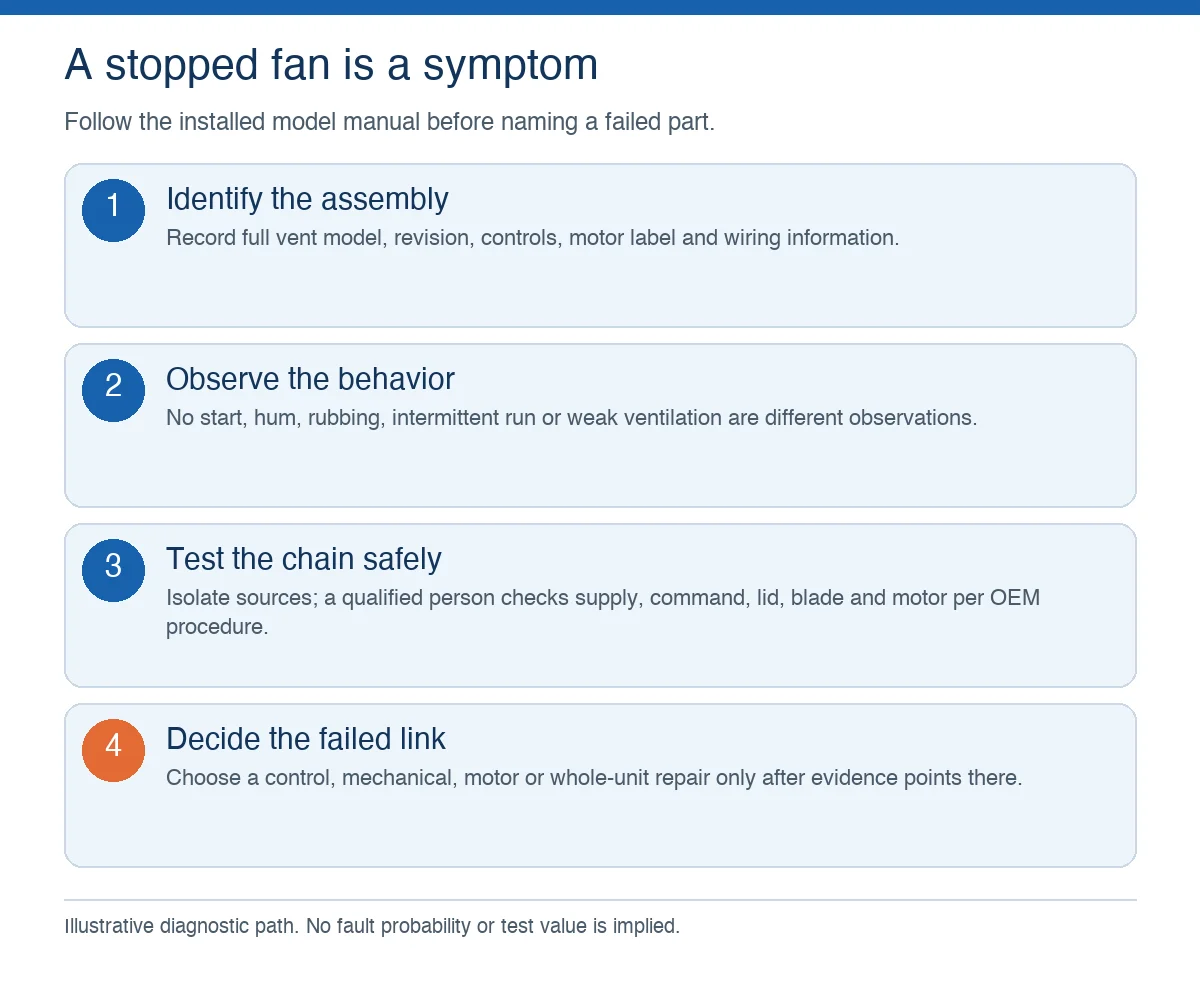
The diagram below keeps observations, safe isolation and model-specific checks separate. After the power sources are controlled under the vehicle and fan manuals, a qualified technician can test the supply and command path under the manufacturer’s procedure. Mechanical inspection then considers a blocked blade, hub, bearing and lid drive. The part decision follows the tests rather than preceding them.
Control all power sources before service
A nominal 12 V fan may still be connected to a battery, converter, shore-power system, solar equipment or another feed in the vehicle. Turning off a wall switch is not proof that the circuit is isolated. Identify the relevant sources from the vehicle wiring information, follow the fan maker’s service instructions and verify the intended circuit is de-energized before touching conductors or a moving blade.
Dometic’s FanTastic Vent installation and operation manual warns to disconnect specified RV power sources before installation work and to disconnect power before cleaning or servicing. Its steps apply to the covered models, so use the corresponding manual for another unit. Do not improvise a direct-battery spark test, bypass an interlock, work near an unguarded powered blade or walk on a roof without manufacturer-approved access.
Match the whole motor and control interface
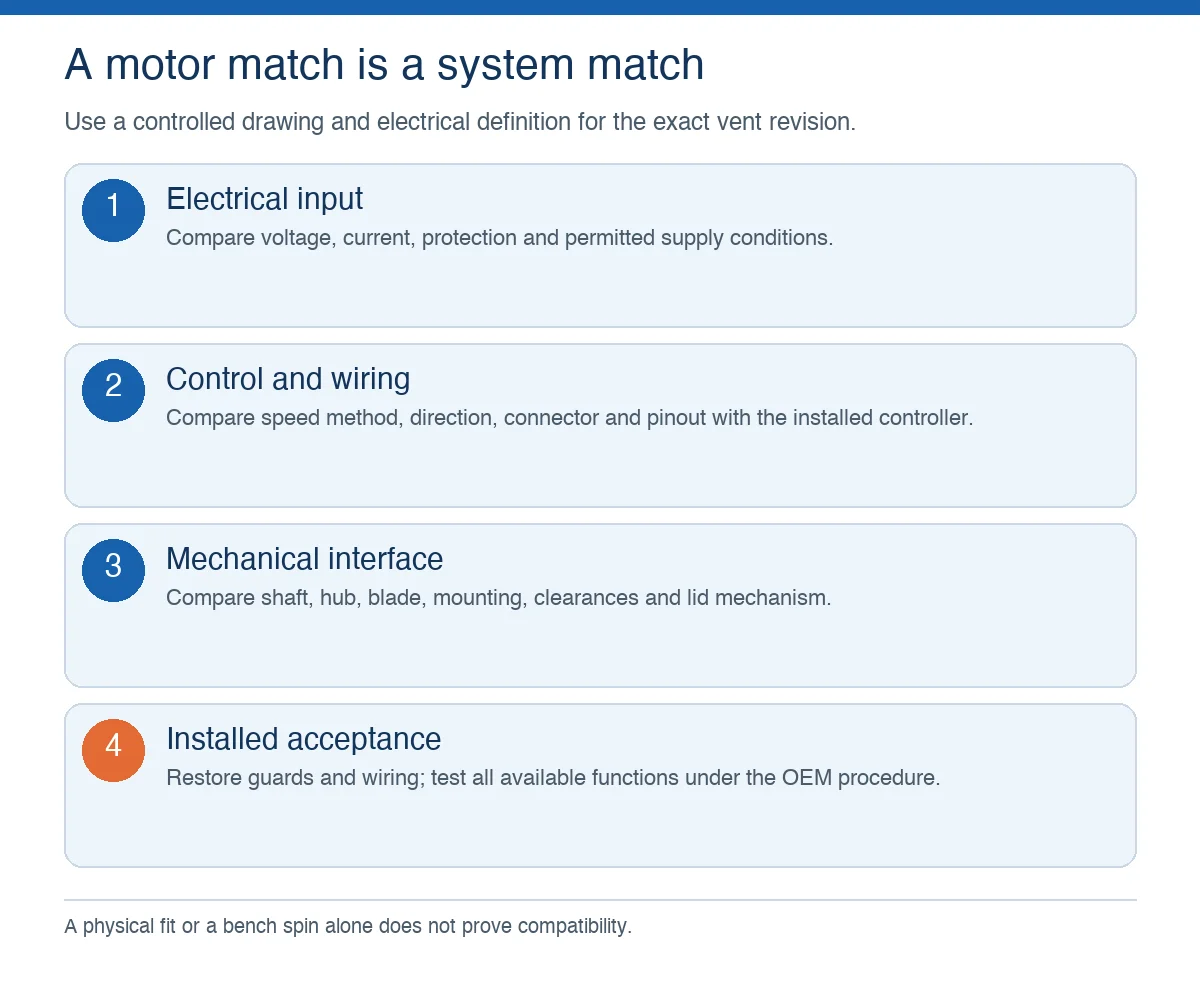
Once testing points to the motor, compare a candidate replacement against the exact assembly record. Check rated voltage and current, direction of rotation, speed-control method, connector and pinout, shaft diameter and length, blade hub, mounting pattern, thermal protection and expected environment. The controller and blade must be compatible with the proposed motor, not just the bracket. A motor that physically fits can still rotate in the wrong direction, draw an unsuitable current or fail to respond to the installed speed control.
Ask the equipment maker or supplier for a revision-matched drawing and electrical definition. Photographing the old part is useful for identification, but appearance alone cannot prove equivalence. If those records are unavailable, hold the part selection rather than presenting a generic 12 V motor as a safe substitute.
Decide whether a motor or complete vent is the right scope
A motor repair addresses a proven motor fault. It does not repair a cracked housing, damaged lid drive, failed controller, corroded wiring or compromised roof seal. Compare the available service kit, required labor and exact mechanical interface with the complete-unit option. Any roof opening or seal work needs the vehicle and vent manufacturer’s approved method; an inside-only motor repair is possible on some units but cannot be promised for an unknown design.
LONGWELL’s OEM engineering workflow describes reviewing electrical input, controls, installation envelope and motor/fan integration before a platform is proposed. That is a useful procurement checklist. It does not establish that any listed LONGWELL roof-exhaust product or motor fits an RV vent. The company’s industrial roof exhaust fan family serves a different equipment class and should not be used as a replacement reference here.
Verify the assembled unit before travel
After a documented repair, restore guards, fasteners, wire protection, blade clearance and the lid mechanism before energizing the system. Test commanded start and stop, each available speed and direction, and any automatic feature present on that exact model. Check for rubbing, vibration and unusual noise; compare current with the manufacturer’s approved test values and method. If the roof seal was disturbed, verify it using the vehicle maker’s inspection procedure. A successful bench spin alone is not an installed-system acceptance test.
Keep the model, revision, replacement part number and test record together. They make the next service decision easier and prevent a motor chosen for one vent from becoming an assumed match for another. The practical rule is simple: identify the assembly, diagnose the failed link, match the full interface and test the installed result.